You may be eager to start playing beautiful music on the piano, but first you need to understand the layout of the keys. Learning to label piano keys is an essential step that will enable you to navigate the keyboard confidently.
Labeling the keys brings many benefits. It helps you memorize the notes more quickly, recognize patterns and intervals, understand music theory concepts, read sheet music faster, and have more fun with your playing overall. Whether you use stickers, markers, apps, or memorization techniques, having the note names at your fingertips will accelerate your learning.
In this comprehensive guide, we will explore piano key layouts, methods for labeling keys, tips for effective labeling, and more. With dedication and consistent practice, you’ll be able to identify notes by sight and play melodies in no time. Let’s begin unraveling the mystery of those black and white keys!
Understanding Piano Key Layout
The standard piano keyboard contains 88 keys spanning over seven octaves. It is comprised of 52 white keys and 36 black keys arranged in a distinct pattern.
- The white keys are known as naturals and represent the notes A, B, C, D, E, F and G. These repeat in alphabetical order across the keyboard.
- The black keys are known as sharps or flats and represent the notes in between the white keys.
- They alternate between groups of two (C♯/D♭ and F♯/G♭) and groups of three (D♯/E♭, G♯/A♭, and A♯/B♭).
- The pattern of white keys is easy to recognize, as it follows the simple sequence A-B-C-D-E-F-G. Then this repeats, starting over with A again.
- Octaves on the piano keyboard are comprised of 12 keys, following this pattern. Then the sequence repeats identically in the next octave.
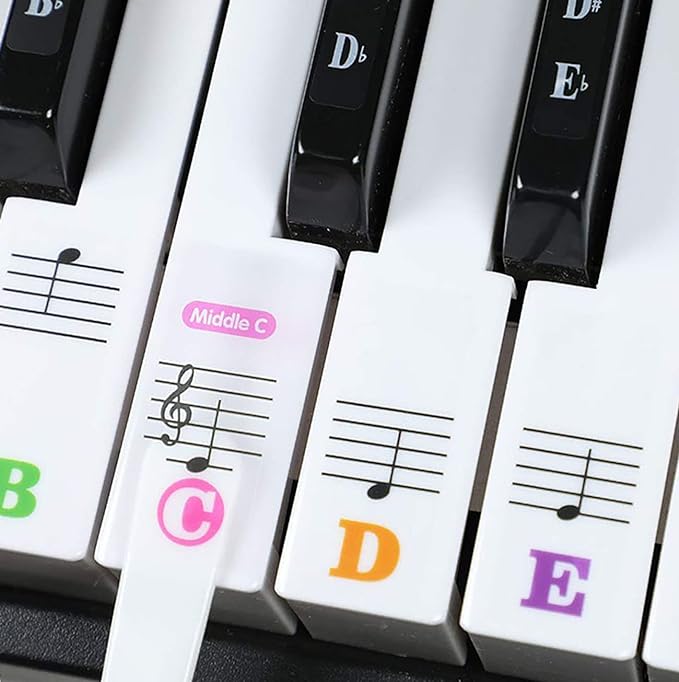
- Middle C is an important reference point, situated right in between the bass and treble clef. You can locate other notes by orienting yourself to middle C.
Here is a 61-key keyboard diagram to demonstrate the note pattern:

Memorize the groups of two and three black keys, as they act as markers between white keys. For example, a C note is always located just to the left of a group of two black keys. An F note is always to the left of a group of three black keys.
Methods of Labeling Piano Keys
There are several effective techniques you can use to label your piano keys, depending on your learning style and preferences.
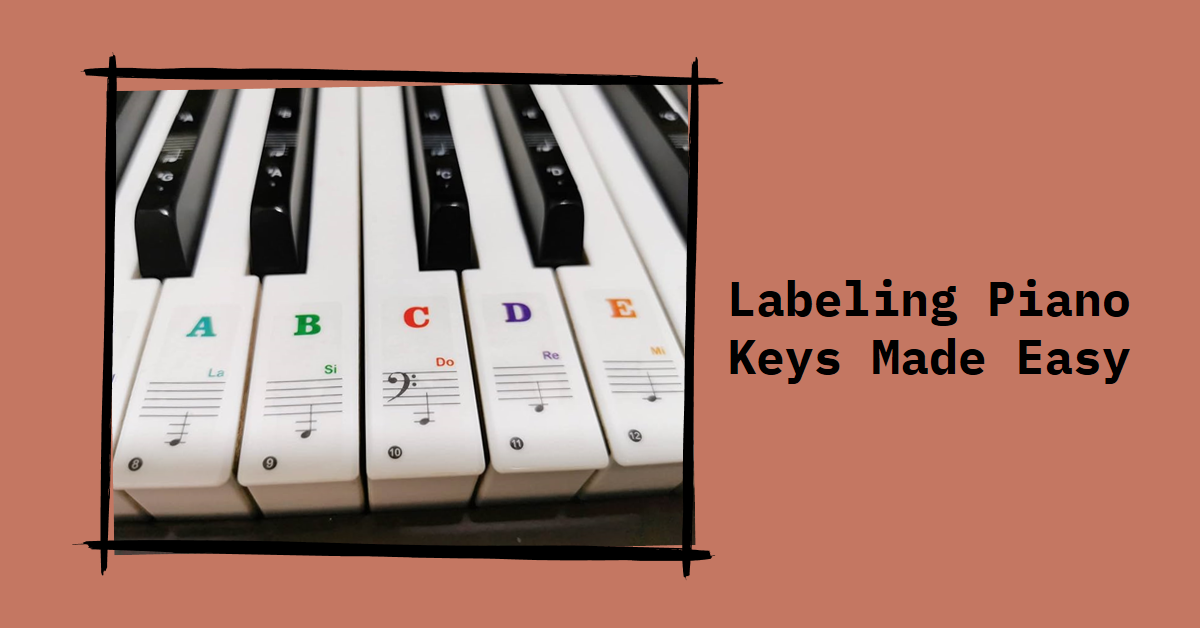
Stickers
Stickers offer a versatile option for labeling piano keys.
Pros:
- Easy to apply and remove
- Various designs and colors available
- Can label both white and black keys
- Fun for younger students
Cons:
- Can be bulky and affect key movement
- Adhesive may damage piano finish over time
- May not be suitable for textured key surfaces
When using stickers:
- Choose thin, low-profile stickers that hug the key tightly
- Start by just labeling C notes to orient yourself, then fill in other notes
- Use a consistent color-coding system (e.g. all C notes red, all F notes blue)
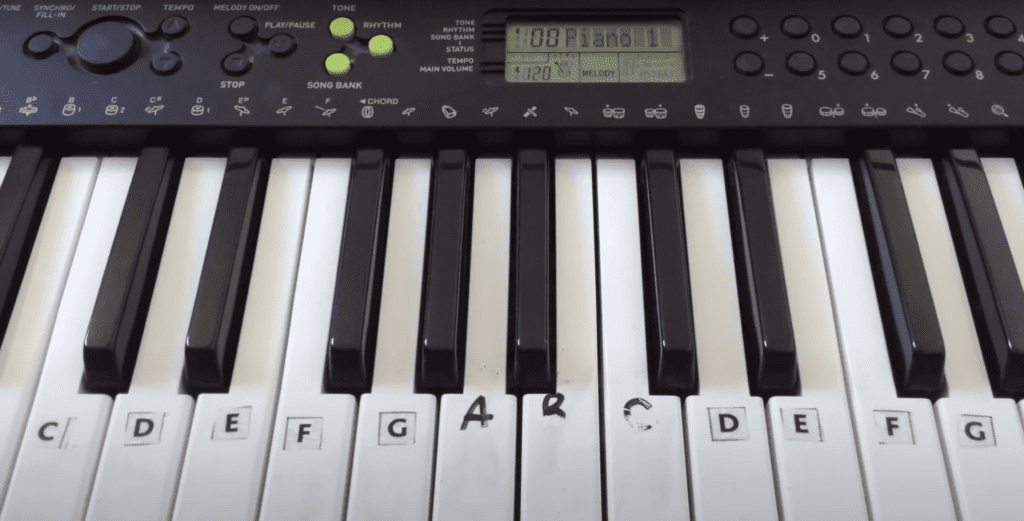
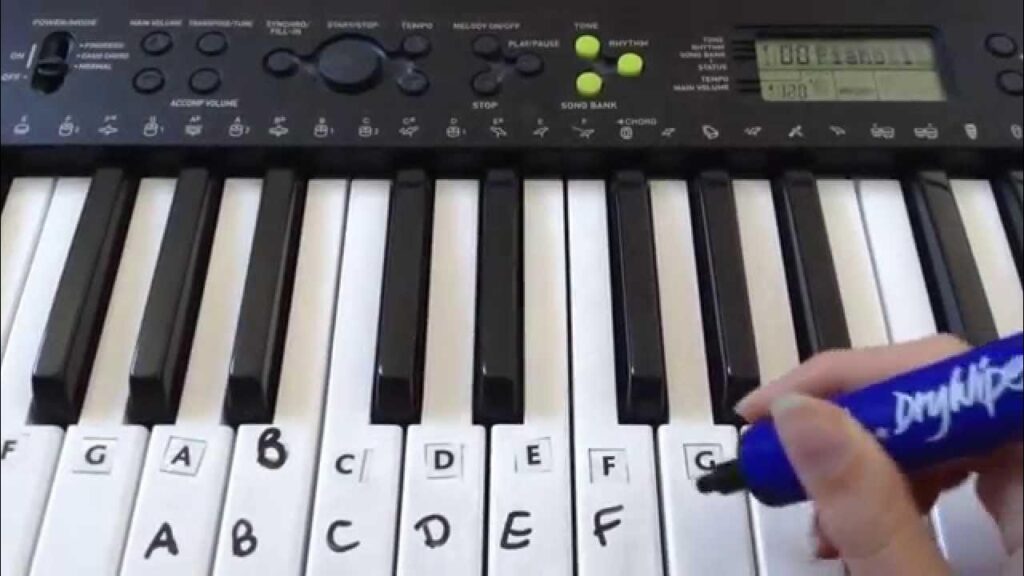
Markers
Permanent markers offer an inexpensive labeling option.
Pros:
- Permanent and cost-effective
- Customizable – label keys however you like
- Allows color-coding of keys
Cons:
- Can permanently damage keys if not applied carefully
- Ink may fade or rub off over time
- Limited color options
Tips for using markers:
- Test on a small area first before labeling all keys
- Use thin tip markers for precision
- Consider using removable window clings instead of permanent markers
Memorization
With dedication, you can memorize the keyboard layout through consistent practice.

Pros:
- No physical labels required
- Promotes deeper understanding of theory
- Looks impressive to perform without visible note markers
Cons:
- Very time consuming initially
- Easy to forget notes without frequent practice
- Difficult for younger students
Memorization techniques:
- Start by memorizing groups of two and three black keys
- Drill note names verbally while playing
- Use interval recognition instead of relying on exact note names
Digital Tools
Fun apps and games can reinforce note recognition.
Pros:
- Interactive and engaging interface
- Can be used alongside lessons and online resources
- Appeals to tech-savvy learners
Cons:
- Requires a smartphone or tablet
- Effectiveness depends heavily on specific app/program
- Not suitable for traditional acoustic pianos
When using apps and software:
- Take advantage of labeling, testing, and game features
- Use tools alongside other methods for a multi-sensory approach
- Ensure the technology enhances progress rather than becoming a distraction
Tips for Effective Labeling
Follow these top tips for success when labeling your piano keys:
Choose a method suited to your learning style
Determine whether you prefer visual, auditory, or kinesthetic learning. Stickers or markers may appeal more to visual learners, while apps and memorization suit auditory and kinesthetic preferences.
Start simple
Initially, only label the white keys or important reference points like middle C. Too much information upfront can feel overwhelming. Build up to labeling black keys and octave numbers later on.
Be consistent with your labeling system
Use the same colors, symbols, or patterns each time. For example, label all C notes red, all F notes blue. This consistency helps reinforce the repeating keyboard pattern.
Reinforce identification in multiple ways
In addition to visual labeling, say note names out loud while playing and recognize intervals (the distance between notes) by ear. These techniques will help notes stick better than passive visual labeling alone.
Make a game out of it
Use flashcards, apps, or quizzes to test your note recognition in engaging ways. See how quickly you can name random notes your teacher or app displays.
Consider partial or temporary labeling
Some students benefit from removing labels gradually over time. For example keep only C stickers, or remove a few each week.
Use labeling as an analysis tool
Observe how melody patterns correspond with the labeled keys. See how intervals look on labeled keys vs. how they sound to your ear. Use labeling to actively analyze as you learn.
Stay motivated in the transition to memorization
As you depend less on labeling, motivate yourself with recordings of beautiful pieces you’ll be able to learn next. The work will pay off!
Conclusion
We hope this guide has helped demystify the layout of the piano keyboard and illuminated some techniques on how to label piano keys effectively.
The journey to fluent note identification will require dedication through regular practice. But the payoff is incredibly rewarding, both for your playing abilities and deeper musical understanding.
Refer back to this article whenever you need guidance or inspiration. Remember that each small step expands your capabilities exponentially. Be patient with the process while also practicing intentionally every day.
We encourage you to start labeling keys today using our tips. Have fun with colorful stickers, customized apps, or memorization drills designed just for you. Learning can and should be an enjoyable adventure, after all!
Stay curious, motivated and celebrate every milestone. You’ve got this! Now unleash your inner musical genius key by key.