Hey there, music maestros! I’ve been around the block a few times when it comes to digital pianos and keyboards, and let me tell you, they’re the bee’s knees! Not only are they incredibly versatile, but they also make playing music more accessible and enjoyable for everyone. Whether you’re a seasoned pianist or a newbie just starting, there’s a digital piano or keyboard out there just for you.
But let’s face it, we’ve all had our fair share of oopsie-daisy moments, which can lead to some common problems like broken or stuck keys. Luckily, you’ve stumbled upon this article that will teach you how to fix broken keys on your digital piano or keyboard. And trust me, with my years of experience, you’re in good hands!
So, buckle up, buttercup, as we dive into the world of fixing digital piano keys, and by the end, you’ll be well-equipped to tackle any key-related issue that comes your way. And hey, who knows? You might even become a key expert yourself! (Get it? I know, I’m hilarious!)
Now, without further ado, let’s get those fingers ready to tickle those ivories once again!
Identify the Cause of the Broken Key
Before we start our repair journey, it’s crucial to play detective and uncover the mystery behind the broken key. Knowing the root cause will make fixing those pesky piano keys that much easier. Here are some possible culprits:
- Physical damage: Accidents happen, even to the best of us! Dropping something heavy on your keyboard or accidentally stepping on it (don’t ask me how I know) can cause keys to break or become stuck.
- Loose or broken parts: Sometimes, keys can become dislodged or broken due to wear and tear, or even faulty manufacturing. It’s just a fact of life for digital pianos and keyboards.
- Wear and tear: Like a fine wine, pianos and keyboards age, but not always gracefully. Over time, the constant use of your digital piano or keyboard can cause keys to wear down, making them prone to breaking.
Whether you have a digital piano for beginners or a high-end model, these issues can happen to the best of us. So, don’t fret, my friend! We’re going to tackle this problem together.
Now that we’ve identified some possible causes, it’s time to roll up our sleeves and get down to business. Fixing broken keys, here we come!
How to Fix Broken Keys on a Digital Piano/Keyboard
Alrighty, let’s dive into the nitty-gritty of fixing those rebellious keys. Just follow these simple steps, and you’ll be a key-fixing maestro in no time! Remember, safety first – always unplug your digital piano or keyboard before attempting any repairs. Here we go:
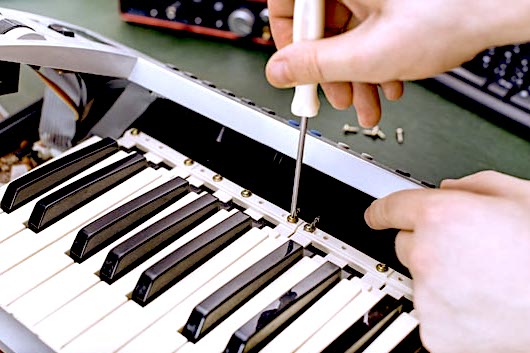
Step 1: Remove the broken key
First things first, let’s get that pesky broken key out of the way. To do this, you’ll need to remove the casing or cover of your digital piano or keyboard. Depending on your specific model, this may involve unscrewing some screws or unclipping some latches. Once you’ve got the cover off, you should have a clear view of the key mechanism. Carefully lift the broken key off the keyboard, making sure not to damage any surrounding parts.
Step 2: Examine the key and surrounding area for damage
Now that you’ve got the broken key out, it’s time to play a detective again. Examine the key and the area around it for any signs of damage, such as cracks, loose parts, or any other issues. This will help you determine if you need to repair or replace the key, or if there are any other underlying problems.
Step 3: Replace or repair the key
Once you’ve assessed the damage, it’s time to fix that key! If the key itself is damaged, you’ll need to replace it with a new one. You can often find replacement keys online, or you can contact the manufacturer of your digital piano or keyboard. If the key is in good shape, but there’s an issue with the mechanism underneath, you may need to repair or replace that part instead. Make sure to consult your instrument’s manual or reach out to the manufacturer for guidance on the best course of action.
Step 4: Reassemble the keyboard
With your key issue resolved, it’s time to put Humpty Dumpty back together again! Carefully place the key back onto the keyboard, ensuring it’s correctly aligned and secure. Then, reattach the casing or cover and screw or clip it back into place. Give your digital piano or keyboard a quick test run to make sure everything is working smoothly.
And voilà! You’ve just fixed a broken key on your digital piano or keyboard like a pro! Give yourself a well-deserved pat on the back.
Preventing Broken Keys
Now that we’ve conquered the art of fixing broken keys, let’s talk about how to keep those pesky problems at bay. After all, prevention is the best medicine! Follow these tips to ensure your digital piano or keyboard stays in tip-top shape for years to come:
- Regular maintenance: Just like you need check-ups, so does your digital piano or keyboard. Keep it clean by dusting it regularly and removing any debris that might get stuck between the keys. A little TLC goes a long way in keeping your instrument in pristine condition.
- Proper use: When playing your digital piano or keyboard, make sure to use the right amount of pressure. You don’t need to channel your inner Hulk when tickling the ivories! Being gentle with your keys can prevent unnecessary wear and tear.
- Storage: If you’re not using your instrument, store it in a safe place, away from extreme temperatures and humidity. A small piano or keyboard cover can help protect it from dust and potential damage.
- Transportation: When moving your digital piano or keyboard, handle it with care. Make sure to use a proper carrying case or gig bag to protect it from bumps and bruises.
By following these preventative measures, you’ll minimize the risk of broken or stuck keys and keep your digital piano or keyboard sounding great for a long time. Happy playing!
Conclusion
Well, my fellow music enthusiasts, we’ve reached the end of our key-fixing adventure! Let’s recap the main points of this article to make sure we’ve got everything covered:
- Identifying the cause of the broken key is crucial for a successful repair.
- Following our step-by-step guide, you can now confidently fix broken keys on your digital piano or keyboard.
- Preventing broken keys is essential, so be sure to practice regular maintenance, proper use, and safe storage.
Remember, if you ever feel out of your depth or unsure about fixing your digital piano or keyboard, it’s always a good idea to seek professional help. After all, your instrument is an investment, and taking care of it is of utmost importance.
Now go forth and conquer the world of digital pianos and keyboards with your newfound knowledge! And hey, if you ever need a refresher, just remember your friendly, funny, and bursty guide is always here to help. Keep on rocking, and may your keys forever be in tip-top shape!